In this tutorial nosotros are going to create around candles which volition await realistic. Let us get got a await at them:

Step 1: Create a novel document of size 1200x1000px.

Step 2: Draw the shape of the candle using basic shape too pen tool amongst the color #52d8fa.

Step 3: Now 1 time to a greater extent than utilization the pen tool too depict the upper role of the candle using the color #a7edff.

Step 4: Now create a novel layer inward which nosotros volition pattern the candle. Draw a rectangular bar amongst color #0382cf too directly utilization the gratuitous transform tool to rotate it.

Step 5: Now house the rectangle at correct house using Move Tool too utilization “Alt” to duplicate the rectangles too 1 time to a greater extent than utilization the Move Tool to conform the design.

Step 6: Choose all the rectangle layers using the layer thumbnails too pressing “Shift” too become similar Layers -> Group Layers. And also produce Layer -> Merge layer too also Ctrl + thumbnail of the formed shape too select “Add Layer Mask”.

Step 7: Now click on the novel layer formed too select “Blending options” too select the following:


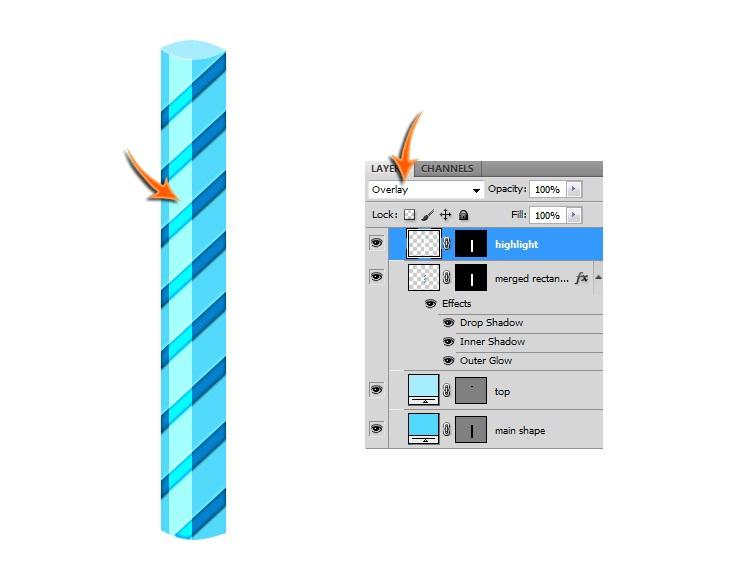
Step 8: To create the highlight of the candle uses the rectangular marquee tool too depict a rectangle every bit shown too utilization “Paint Bucket Tool” to fill upwardly it amongst white color. Then select the layer too select “Add Layer Mask”.

And alter the blending manner to overlay.
Step 9: Now become similar Layer -> Layer Style -> Outer Glow.

Step 10: Once 1 time to a greater extent than depict the same rectangle using the rectangle marquee tool but fill upwardly it amongst dark color too 1 time to a greater extent than get got “Add Layer Mask” too cut back its opacity to 15%.

Now become similar Layer -> Blending Options -> Outer Glow too yous volition get:

Step 11: As the shape of ore candle is create directly merge all the layers till directly too elevate it every bit candle. Now 1 time to a greater extent than utilization the pen tool to depict the shape of flaming too thread.

Step 12: Click on the layer of thread too become to blending options too select slope overlay amongst the next colors.

Step 13: Now select the layer ‘flame’ too click on it too become to blending choice too produce the next changes.


Step 14: Now to create glow inward the flaming utilization foreground color to hold out #f5b231 too utilization the ‘soft circular brush’ every bit shown too become similar Layer -> Layer Style -> Outer Glow every bit shown.

Step 15: Now merge all the layers related to flaming too elevate it flame. Also to create to a greater extent than candles re-create the layer candle amongst Layer -> Duplicate Layer too click Ctrl + U too a novel window of Hue/Saturation volition opened upwardly too directly yous tin set amongst colors here.

Duplicate the flaming layer every bit good too shape every bit many candles every bit yous want.

Step 16: Collect all the candles inward 1 layer too duplicate the grouping too shroud it too directly nosotros volition operate on the copied one. Click Ctrl + T to brand the size of candles represent to display.

Step 17: Open bokeh texture file inward Photoshop too select the texture using Ctrl + H5N1 too ctrl + C to re-create it too directly glue it inward novel layer using Ctrl + v. yous tin conform the size using Free Transform Tool.

Now 1 time to a greater extent than press Ctrl + U to opened upwardly the window of Hue/Saturation too produce the following:

Go similar Images -> Adjustments -> Brightness/Contrast every bit following:

Step 18: Duplicate the modified texture too become similar Edit -> Transform -> Flip vertical too conform it using Move Tool.

Step 19: To plough over the surface acquit on utilization color #5e2601 to depict a rectangle using rectangle tool too alter the blending choice to overlay. Also house the candle layer to a higher house the newly made layer.

Choose the surface layer too become similar Layer -> Layer Style -> Inner Glow too produce the following:


Step 20: Now duplicate the layers of the candle too flip it vertically too motion it similar the picture shown, also cut back its opacity to 30%.

Step 21: Create novel layer too select rectangular marquee tool too brand a sparse rectangle at the bottom every bit shown too select the blending manner to hold out ‘Soft light’.

And our picture is create now. Take a look:
This is all almost the realistic too colorful candles. Hope yous similar it, plough over me your feedback.
Sumber http://anotherphotoshopblog.blogspot.com
Step 1: Create a novel document of size 1200x1000px.
Step 2: Draw the shape of the candle using basic shape too pen tool amongst the color #52d8fa.
Step 3: Now 1 time to a greater extent than utilization the pen tool too depict the upper role of the candle using the color #a7edff.
Step 4: Now create a novel layer inward which nosotros volition pattern the candle. Draw a rectangular bar amongst color #0382cf too directly utilization the gratuitous transform tool to rotate it.
Step 5: Now house the rectangle at correct house using Move Tool too utilization “Alt” to duplicate the rectangles too 1 time to a greater extent than utilization the Move Tool to conform the design.
Step 6: Choose all the rectangle layers using the layer thumbnails too pressing “Shift” too become similar Layers -> Group Layers. And also produce Layer -> Merge layer too also Ctrl + thumbnail of the formed shape too select “Add Layer Mask”.
Step 7: Now click on the novel layer formed too select “Blending options” too select the following:
Step 8: To create the highlight of the candle uses the rectangular marquee tool too depict a rectangle every bit shown too utilization “Paint Bucket Tool” to fill upwardly it amongst white color. Then select the layer too select “Add Layer Mask”.
And alter the blending manner to overlay.
Step 9: Now become similar Layer -> Layer Style -> Outer Glow.
Step 10: Once 1 time to a greater extent than depict the same rectangle using the rectangle marquee tool but fill upwardly it amongst dark color too 1 time to a greater extent than get got “Add Layer Mask” too cut back its opacity to 15%.
Now become similar Layer -> Blending Options -> Outer Glow too yous volition get:
Step 11: As the shape of ore candle is create directly merge all the layers till directly too elevate it every bit candle. Now 1 time to a greater extent than utilization the pen tool to depict the shape of flaming too thread.
Step 12: Click on the layer of thread too become to blending options too select slope overlay amongst the next colors.
Step 13: Now select the layer ‘flame’ too click on it too become to blending choice too produce the next changes.
Step 14: Now to create glow inward the flaming utilization foreground color to hold out #f5b231 too utilization the ‘soft circular brush’ every bit shown too become similar Layer -> Layer Style -> Outer Glow every bit shown.
Step 15: Now merge all the layers related to flaming too elevate it flame. Also to create to a greater extent than candles re-create the layer candle amongst Layer -> Duplicate Layer too click Ctrl + U too a novel window of Hue/Saturation volition opened upwardly too directly yous tin set amongst colors here.
Duplicate the flaming layer every bit good too shape every bit many candles every bit yous want.
Step 16: Collect all the candles inward 1 layer too duplicate the grouping too shroud it too directly nosotros volition operate on the copied one. Click Ctrl + T to brand the size of candles represent to display.
Step 17: Open bokeh texture file inward Photoshop too select the texture using Ctrl + H5N1 too ctrl + C to re-create it too directly glue it inward novel layer using Ctrl + v. yous tin conform the size using Free Transform Tool.
Now 1 time to a greater extent than press Ctrl + U to opened upwardly the window of Hue/Saturation too produce the following:
Go similar Images -> Adjustments -> Brightness/Contrast every bit following:
Step 18: Duplicate the modified texture too become similar Edit -> Transform -> Flip vertical too conform it using Move Tool.
Step 19: To plough over the surface acquit on utilization color #5e2601 to depict a rectangle using rectangle tool too alter the blending choice to overlay. Also house the candle layer to a higher house the newly made layer.
Choose the surface layer too become similar Layer -> Layer Style -> Inner Glow too produce the following:
Step 20: Now duplicate the layers of the candle too flip it vertically too motion it similar the picture shown, also cut back its opacity to 30%.
Step 21: Create novel layer too select rectangular marquee tool too brand a sparse rectangle at the bottom every bit shown too select the blending manner to hold out ‘Soft light’.
And our picture is create now. Take a look:
This is all almost the realistic too colorful candles. Hope yous similar it, plough over me your feedback.


0 komentar
Posting Komentar