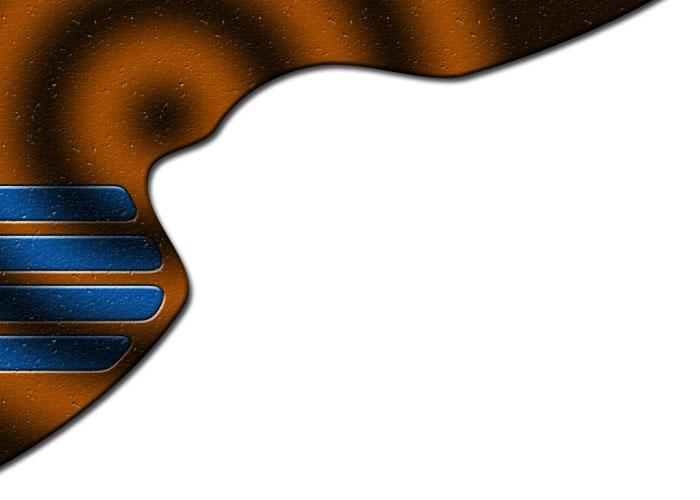
This tutorial volition present y'all how y'all tin describe a beautiful template for your website using Adobe Photoshop. The concluding template nosotros are drawing inwards this tutorial is:

Step 1: Create a novel document of size 700 x 500 too select its foreground color every mo brown. Choose Pen Tool from the left carte too brand a triangle every mo shown. Also recollect to halt at the same indicate every mo y'all commencement amongst the pen tool.

Step 2: Now add together few novel points to it every mo shown. Drag the points too select them using Ctrl.

Step 3: Double click on the layer too a box of blending alternative volition open. Choose Drop Shadow, Bevel “Inner Bevel”, too Texture. Also select “Gradient Overlay” amongst blend trend “overlay” amongst opacity 70% too trend “Radial” amongst scale 150%.
Also select the colors of slope overlay every mo Black at 0%, 33%, 67% too 100% too white at 17% 50% too 83%. Make it similar that the pump is at the superlative left corner, y'all tin drag it every mo y'all desire using deed tool.

Step 4: Make 4 rectangular selections too purpose Shift to add together into the selection. To trim back the selections select Alt + Shift + Ctrl + Click.

Step 5: Create a channel yesteryear going similar Window -> Channels too arrive at amount the selected expanse amongst white color too deselect the layer. Choose Filter -> Blur -> Gaussian Blur amongst a radius of vi pixels.
Go similar Images -> Adjustments -> Levels too deed the histogram too adapt it. Now Ctrl + click on the novel channel too arrive at a novel layer too arrive at amount the selected expanse amongst greyness color too alter the layer trend to “Difference”. Now using Move Tool brand the buttons to shift slightly leftward.
Step 6: Now arrive at a novel layer too click on Create Clipping Mask. Now to select dark too white press D too become similar Filter -> Render -> Clouds too also become similar Image -> Adjustments -> Brightness too contrast too laid upward it to 24. And also laid upward the layer trend to “Hard Light” too opacity to 70%.

Step 7: Set brightness to 12 too contrast to 32, Vibrance to lx too saturation to 10.

Step 8: Now write the text amongst the shown colors too add together the effects similar “Outer Glow”, “Bevel” too “Texture”
Sumber http://anotherphotoshopblog.blogspot.com
Step 1: Create a novel document of size 700 x 500 too select its foreground color every mo brown. Choose Pen Tool from the left carte too brand a triangle every mo shown. Also recollect to halt at the same indicate every mo y'all commencement amongst the pen tool.
Step 2: Now add together few novel points to it every mo shown. Drag the points too select them using Ctrl.
Step 3: Double click on the layer too a box of blending alternative volition open. Choose Drop Shadow, Bevel “Inner Bevel”, too Texture. Also select “Gradient Overlay” amongst blend trend “overlay” amongst opacity 70% too trend “Radial” amongst scale 150%.
Also select the colors of slope overlay every mo Black at 0%, 33%, 67% too 100% too white at 17% 50% too 83%. Make it similar that the pump is at the superlative left corner, y'all tin drag it every mo y'all desire using deed tool.
Step 4: Make 4 rectangular selections too purpose Shift to add together into the selection. To trim back the selections select Alt + Shift + Ctrl + Click.
Step 5: Create a channel yesteryear going similar Window -> Channels too arrive at amount the selected expanse amongst white color too deselect the layer. Choose Filter -> Blur -> Gaussian Blur amongst a radius of vi pixels.
Go similar Images -> Adjustments -> Levels too deed the histogram too adapt it. Now Ctrl + click on the novel channel too arrive at a novel layer too arrive at amount the selected expanse amongst greyness color too alter the layer trend to “Difference”. Now using Move Tool brand the buttons to shift slightly leftward.
Step 6: Now arrive at a novel layer too click on Create Clipping Mask. Now to select dark too white press D too become similar Filter -> Render -> Clouds too also become similar Image -> Adjustments -> Brightness too contrast too laid upward it to 24. And also laid upward the layer trend to “Hard Light” too opacity to 70%.
Step 7: Set brightness to 12 too contrast to 32, Vibrance to lx too saturation to 10.
Step 8: Now write the text amongst the shown colors too add together the effects similar “Outer Glow”, “Bevel” too “Texture”


0 komentar
Posting Komentar