
Here is a tutorial on how to brand a popular fine art lawsuit inward GIMP. The kickoff footstep is removing photograph color alongside desaturate command, thence brand a option using the Scissor select tool, employ color posterize command, exercise the despeckle filter to smoothes the posterize lawsuit together with lastly, laissez passer color using a slope tool. Let's function started:
1. Open the Photo, Duplicate Layer Then Desaturate.
Choose File> Open to opened upwards your photograph inward GIMP. Duplicate the Background layer yesteryear choosing Layer> Duplicate Layer, thence Desaturate photograph yesteryear choosing Colors> Desaturate. For this GIMP tutorial, I'll exercise this paradigm that I downloaded from Pixabay.

2. Create a Selection Then Invert The Selection.
I volition exercise Scissor Select Tool to exercise a option only about the portraits. Make certain that the starting signal of the option meets alongside the endpoint selection. Click on a purpose inward the option to modify the path into a option together with thence Invert Selection yesteryear choosing Select> Invert.


3. Fill The Selection Area With White Color.
Press the missive of the alphabet D to reset the foreground color/background to default. Then pick out Edit> Fill alongside BG color. The Selection surface area straight off has a white color. Remove the option yesteryear choosing Select> None.
4. Add Colors Posterize Command.
Choose carte du jour Colors> Posterize. I volition fill upwards inward the value of Posterize levels alongside 2. Click the OK button.

5. Smoothen With Despeckling.
Choose Filter> Enhance> Despeckle to smoothen the lines on the photo. I volition fill upwards Radius alongside 10, dark Levels alongside -1 together with White Levels alongside 256. Click the OK button.

6. Add Stroke.
Create a boundary box only about the photograph yesteryear selecting the carte du jour Select> All, together with thence pick out Select> Border. In the dialog box Border, I volition fill upwards the width of the edge alongside lx pixels. Click the OK button. Then fill upwards alongside a dark edge yesteryear choosing Edit> Fill alongside FG color. Remove the option yesteryear choosing Select> None.

7. Create Selection With Fuzzy Select Tool.
Click the icon Fuzzy Select Tool inward the Toolbox together with select Add to the electrical flow option on the Tool Options, Please brand a option yesteryear clicking all the dark surface area of the photo.


8. Set the Blend Tool.
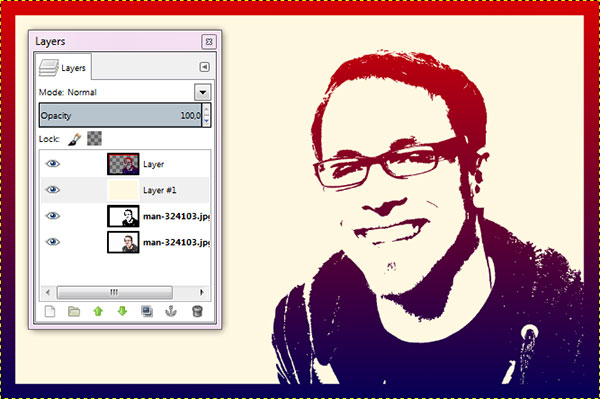
Click the Blend Tool icon inward the Toolbox. Click the box to the foreground together with thence the background to pick out a color slope that yous want. I would pick out the bluish together with blood-red color. In the Tool Options, pick out Gradient FG to BG together with linear slope shape.


9. Create a New Layer Then Apply Gradient.
Create a novel layer yesteryear clicking the Create a novel layer icon together with pick out the layer transparent. Make certain the novel layer is inward the function yesteryear position. Then employ the slope yesteryear clicking on the bottom together with drag upwards. Remove the option yesteryear choosing Select> None.

10. Add Background.
The concluding footstep is to add together a layer to the background. Click the foreground color box together with select a color for the background. We recommend that yous select the color of human skin. Click the Create a novel layer icon to exercise a novel layer. Create a transparent layer. Place this novel layer at the minute seat from the top. Then Fill this layer alongside the foreground color that had us pick out yesteryear selecting Edit> Fill alongside FG color.
Here is the photograph earlier applying popular fine art effect:

And hither is the result:


0 komentar
Posting Komentar