
Over the next steps, I volition demo yous how to exercise a photograph mosaic inwards Adobe Photoshop using Pattern (Edit> Define Pattern) as well as Guides (View> New Guide) to aid us position images. By combining the role of Guides alongside the “Snap” feature, nosotros tin perfectly align images along guidelines. We'll experiment alongside a diversity of imagery to construct upward a digital mosaic. After mastering this uncomplicated technique, yous tin brand coin for doing something yous taste doing. You tin detect jobs online inwards jooble.org. Let's teach started!
1. Prepare Photos For Mosaic Pattern.
Please laid upward or download the photos to last used every bit a mosaic pattern, at to the lowest degree 10 dissimilar photos. You tin download photos for complimentary from Pixabay, Stockvault or Rgbstock. For this Photoshop tutorial, I'll role images that I downloaded from Pixabay.
2. Create New Document For Pattern.
Open Photoshop as well as hence teach to File> New ascendency inwards the make menu. In the pop-up window, come inwards the next information: Width 1500 pixels, Height 1500 pixels, Resolution 72 Pixels/Inch, Color Mode RGB color, as well as Background contents White. Click OK.

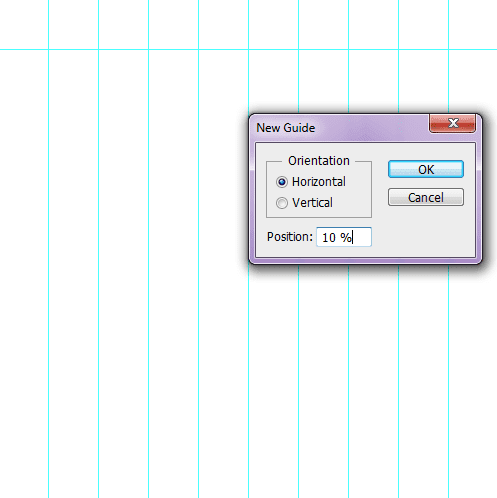
3. Create a Vertical Guide.
Guides aid yous position whatever object (shapes or images) precisely. We volition exercise ix vertical guides. Create the showtime vertical guide. Choose View> New Guide. In the dialog box, select Vertical orientation, come inwards 10 % position as well as click OK. Repeat this pace for position 20%, 30%, 40%, 50%, 60%, 70%, 80% as well as 90%.
If yous didn't meet the guidelines, hence direct View> Show> Guides.
If yous didn't meet the guidelines, hence direct View> Show> Guides.


4. Create a Horizontal Guide.
Now exercise horizontal guides. We volition exercise ix horizontal guides. Choose View>New Guide. In the dialog box, select Horizontal orientation, come inwards 10 % position as well as click OK. Repeat this pace for position 20%, 30%, 40%, 50%, 60%, 70%, 80% as well as 90%.
If yous desire to lock all guides, direct View>Lock Guides. This agency yous can't deed them yesteryear accident.
Snapping is a useful characteristic inwards Photoshop that allows users to align images, layers, shapes or text perfectly alongside other objects or guides. Choose View>Snap to enabling snaping that volition aid yous to align whatever object (including images) yous want. Make certain that View>Snap to>Guides is checked.
5. Insert Image.
Choose File>Place ascendency inwards the make carte du jour to opened upward the paradigm you'd similar to insert. Click on the image, hence click OK. You tin right away edit the paradigm every bit follows:
- Resize the paradigm yesteryear dragging whatever corner piece belongings downward the Shift substitution to driblet dead on the paradigm does non distort.
- Move the paradigm yesteryear clicking as well as concur anywhere within the paradigm as well as drag.
- Rotate the paradigm yesteryear moving your cursor further out from whatever corner until yous meet ii arrows. Click as well as hold, hence drag the image.
- Press Enter substitution when yous are done.

Select the rectangular marquee tool at the make of the Tools panel. Drag it over business office of the paradigm inwards the showtime guide foursquare piece belongings downward the Shift substitution to driblet dead on the rectangular pick doesn't distort, hence duplicate the paradigm layer yesteryear going to Layer>New>Layer via copy or Ctrl+J. You tin right away delete the image's layer.


6. Insert all Image.
Repeat pace v to opened upward as well as manipulate each motion painting you'd similar to insert. The final result volition last shown every bit below:

7. Define Pattern Mosaic.
The adjacent step, Choose Edit> Define Pattern. Name it similar 'Mosaic'. Click the OK button. Now yous tin salve as well as unopen your Pattern.PSD document.

8. Open the Photos You Want To Create Mosaic Effect.
Choose File> Open to opened upward up your primary paradigm inwards Adobe Photoshop, hence exercise a novel layer yesteryear going to Layer>New Layer.
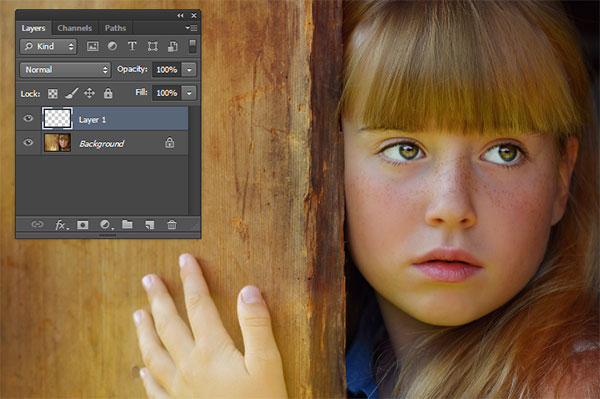
9. Fill alongside Mosaic Pattern.
Select Layer 1 as well as hence direct Edit> Fill. Use the drop-down menu, direct Pattern. In the Custom Pattern, direct a mosaic designing that nosotros previously created. Click the OK button.

10. Desaturate, alter the Blend Mode as well as Opacity.
Desaturate Layer 1 yesteryear choosing Image> Adjustments> Desaturate. Change its blend fashion to Overlay as well as accommodate its opacity if necessary.

11. Save your document.
Go to File>Save ascendency inwards the make carte du jour as well as bring upward your document. Click OK when yous are done.
Here is the result:

- How to exercise a 3D Hexagons Collage inwards Photoshop
- Photo collage alongside seven pictures inwards Photoshop
- A collage alongside 12 pictures unopen to a hexagon inwards Photoshop
- How to exercise a photograph collage trouble solid unit of measurement inwards circles using Photoshop
- How to plough a photograph into a collage of hexagons inwards Photoshop
- Puzzle Photoshop Collage
- Soccer photograph ball collage inwards Photoshop
- 3D photograph cube collage inwards Photoshop
- Spherical photograph collage inwards Photoshop
- Circle Photo collage inwards Photoshop
- Easy agency to exercise mosaic inwards Photoshop CS6
- Rounded foursquare Photoshop Collage
- Rectangle Photoshop Collage
- Triangle Photoshop Collage
- Honeycomb Photoshop Collage
- Crescent Moon Photoshop Collage
- 4 sided polygon Photoshop Collage
- Storyboard Photoshop Collage
- Heart shaped Photoshop Collage
- Four-panel Photoshop photograph collage
- Silhouette Mosaic
- A collage of polaroids
- Photoshop circular collage
- Out of frame photograph collage
- Photoshop grid photograph collage
- Create a Photo Mosaic inwards Photoshop
- Multiple frame photograph collage
- Create Photo Collage inwards Photoshop


0 komentar
Posting Komentar