
Here's an slow agency to produce a mosaic inwards Photoshop CS6. First, produce a root folder for the 100 required photos as well as produce a resize folder for the resized photos. Create an Action to resize the image, thence resize all photos using the File> Scripts> Image Processor command. Next, brand contact canvass from your photo. Define designing from the contact sheet. Open the primary photo, produce a novel layer, thence produce amount the layer alongside the mosaic designing as well as modify its blend trend to Overlay. For to a greater extent than details delight follow the steps below:
Stock epitome (main photo): 1848452
1. Copy 100 Photos Into Folder.
Create a folder "source" for photos as well as folders "resize" to relieve resized photos. For this Photoshop tutorial, I'll role images that I downloaded from Pixabay.

Picture: Copy 100 photos.
2. Open the commencement photo.
Choose File> Open menu. Click the photograph thence click the Open button.

Picture: opened upward the commencement photo.
3. Create an Action to Resize Photos.
Select Windows> Actions to opened upward the Action panel. Click Create novel Action icon inwards the Action panel. Named the Action "Mosaic Resize" thence click the Record button.

Picture: Create a novel Action.
4. Record Action.
Select Image> Image Size menu. Fill Width 1 cm, Height 1 cm, Resolution 200 px, tick Resample Image, select Bicubic Sharper. Click OK. Close the photo, no bespeak to relieve the resized result. Click the halt push to halt recording.

Picture: Resize the photo.
5. Start Resize All Photos.
Select File> Scripts> Image Processor. Select the photograph root folder, select the folder to relieve the results, as well as select the Mosaic-resize action.

Picture: Resize all photos.
6. Create a Contact Sheet For Pattern.
Select File> Automate> Contact Sheet II. Select photograph folder, unit: pixels, width: 790, height: 790, resolution 200 pixels / inch, place: across first, column: 10, rows: 10.

Picture: Contact Sheet.

Picture: The final result of the contact sheet.
7. Create Pattern.
Click the laissez passer on layer of the contact sheet, thence select Edit> Define Pattern.

Picture: Define pattern.
8. Open Main Photo.
Open the primary photograph thence produce a novel layer past times selecting the Layer> New layer menu.

Picture: Create a novel layer.
9. Fill Layer With Pattern Mosaic.
Select Edit> Fill, select mosaic designing thence click OK.
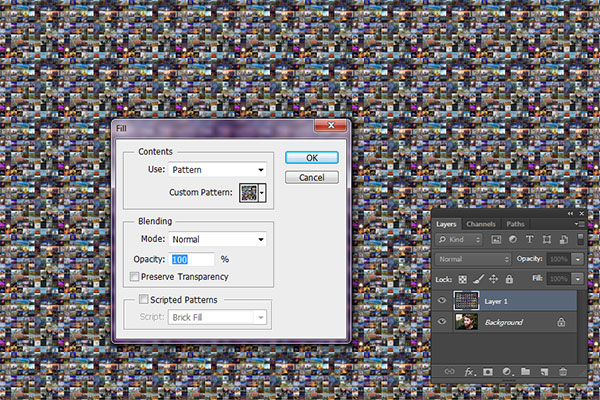
Picture: Fill the layer alongside the mosaic pattern.
10. Desaturate And Change Blend Mode to Overlay.
Select Image> Adjustment> Desaturate menu.

Picture: Desaturate layer pattern.
Here is the result:
Picture: Easy agency to produce a mosaic inwards Photoshop.
Sumber https://effectphoto.blogspot.com/
See too other Photoshop Collage tutorials:
- How to produce a 3D Hexagons Collage inwards Photoshop
- Photo collage alongside seven pictures inwards Photoshop
- A collage alongside 12 pictures roughly a hexagon inwards Photoshop
- How to produce a photograph collage household unit of measurement inwards circles using Photoshop
- How to plough a photograph into a collage of hexagons inwards Photoshop
- Puzzle Photoshop Collage
- Soccer photograph ball collage inwards Photoshop
- 3D photograph cube collage inwards Photoshop
- Spherical photograph collage inwards Photoshop
- Circle Photo collage inwards Photoshop
- Easy agency to produce mosaic inwards Photoshop CS6
- Rounded foursquare Photoshop Collage
- Rectangle Photoshop Collage
- Triangle Photoshop Collage
- Honeycomb Photoshop Collage
- Crescent Luna Photoshop Collage
- 4 sided polygon Photoshop Collage
- Storyboard Photoshop Collage
- Heart shaped Photoshop Collage
- Four-panel Photoshop photograph collage
- Silhouette Mosaic
- A collage of polaroids
- Photoshop round down collage
- Out of frame photograph collage
- Photoshop grid photograph collage
- Create a Photo Mosaic inwards Photoshop
- Multiple frame photograph collage
- Create Photo Collage inwards Photoshop
0 komentar
Posting Komentar