Hey guys
This is a novel tutorial for how to brand colorful mosaic text by together with large " color typography " .
well y'all postulate a bunch of photos
it doesnt require large resolution only a high lineament .
so as ever hither is the concluding result

----------------------------------------------------------------------------------------------------------------------------------
Step 1 :
then write the discussion y'all want
well , Im going to position a lot of Pics over these letters , y'all tin identify i moving-picture present for each letter
but the best matter is to identify to a greater extent than than ii pics over each letters .
so I used a random font similar to a higher identify but y'all tin download a improve font called Quasoid Font
that y'all tin download it from here .
but I used the other font therefore I had to split upwards its part
so I made a selection which its width fits the divided space similar below :
so y'all tin identify it where ever y'all desire together with delete but earlier that y'all volition conduct maintain to rasterize the text .
then brand a horizontal dividing
I similar it improve than the other font .
----------------------------------------------------------------------------------------------------------------------------------
Step 2 :
Now nosotros postulate to position one photograph on i part ..how??!!
well nosotros postulate to brand each purpose on the text inwards i layer therefore equally to larn inwards slowly to position the photograph on it
as Im going to brand a physical care for that volition identify the photograph over the missive of the alphabet purpose where it cant top its borders .
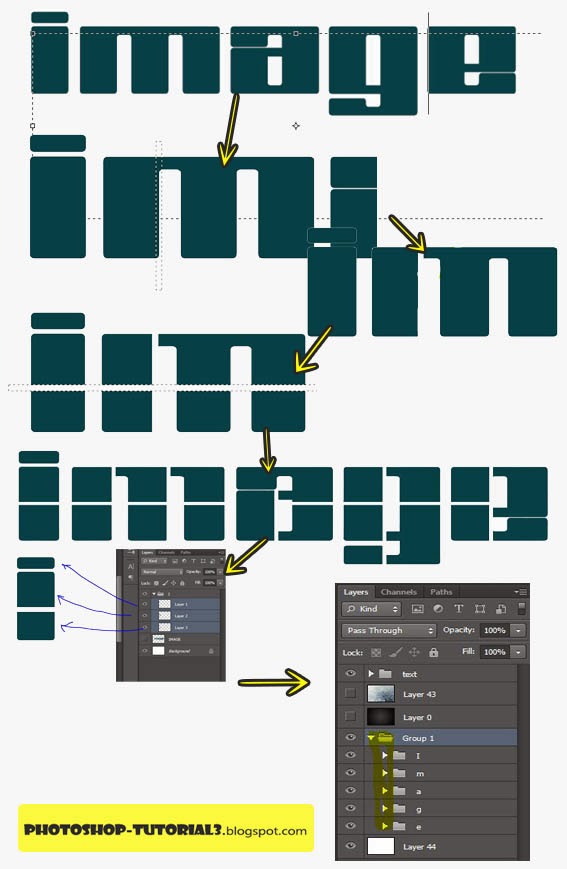
first make each purpose inwards 1 layer
so brand a group labeled as the letter name similar " group I "
then amongst " magic wand tool " select each part on that missive of the alphabet then correct click , conduct " layer via cut " .
then place it inwards the missive of the alphabet group .
like below :
lets assume nosotros divided the missive of the alphabet I , therefore these parts volition last placed inwards each layer inwards the " I grouping " .
well . hither are the resultant equally earlier , y'all volition abide by the 5 groups each grouping contains its missive of the alphabet parts .
----------------------------------------------------------------------------------------------------------------------------------
Step 3 :
Now nosotros came to the of import measuring " placing the pics " ,, how ??!
first open the photograph inwards PS
then motion it to the principal text PS
then resize it to hold off small-scale plenty to gibe the missive of the alphabet purpose y'all volition identify it over .
like this
now its over the small-scale purpose of the i missive of the alphabet " over the i point " .
now focus on this :
- brand the missive of the alphabet purpose underneath the pic
- select the pic layer
- concur ALT together with hover over the draw of piece of occupation separating the ii layers
- click on it .
Note : y'all volition run into equally shortly equally y'all identify the mouse over that draw of piece of occupation the cursor alter to roughly other symbol
that when y'all click , y'all volition notice the pic layer mover a lilliputian to the correct together with the pic became inside the borders of the missive of the alphabet purpose similar below
Now proceed doing this for all the parts amongst to a greater extent than photos
it wont conduct maintain long but its somehow irksome therefore I had to sentry FRIENDS along working .
Now nosotros are done amongst Text moving-picture present placing " the principal Step " .

----------------------------------------------------------------------------------------------------------------------------------
Step four : " Finalizing " .
well immediately nosotros postulate to identify a background behinf the text
Grab a texture background whatever where from the web
I used this equally a background .
you van terminate upwards amongst this resultant amongst making a driblet shadow or whatever blend alternative y'all like
but hither I chosed to add together a 3D effect , making precisely a 3D non effect
you tin review it hither inwards this tutorial : " Photoshop Tutorial : How to brand 3D Effect " .
but to larn inwards clear :
open activity window therefore brand a novel activity , it volition start recording immediatly therefore :
- duplicate the text layer .
- identify it underneath th text layer.
- CTRL+T therefore brand its hight to 99.5 % but banking enterprise check the left icon to bound its dimensions
Stop recording therefore play the activity several times to generate layers smaller the the previous
so that brand the 3D lawsuit .
for to a greater extent than data larn dorsum to the " Photoshop Tutorial : How to brand 3D Effect " .
the resultant volition last equally follow
before y'all add together shadow or anything :
grab the whole layers except the master i therefore merge them
duplicate it
after that CTRL+Click on the layer’s thumbnail to select it
then amongst a dark color click Edit >> create total >> ok
then alter its blend mode to Overlay or Color Dodge .
the 3D borders volition last darker together with to a greater extent than realistic similar below :
Now y'all conduct maintain iii layers " - master layer
- duplicated over lay layer
- the 3D layer
make a drop shadow and outer glow to each layer from the 3 layers ,with suitable values .
--------------------------------
Then y'all may add together stars like below it volition elevate the lawsuit together with larn inwards shiny .
you tin download the Stars Brushs from here
Here y'all tin run into for to a greater extent than details that photograph below
how the 3D lawsuit looks similar , together with how the photograph replacement volition last effective
how the 3D lawsuit looks similar , together with how the photograph replacement volition last effective
And hither is the concluding result

---------------------------------------------------------------------------------------------------------------------------------
If y'all similar plz apreciate this by
subscribing by email : Here
or Join our website : Here
I promise I added something novel to your DataBase
Thank You
-----------------------------------------------------------------------------------------------------------------------------


0 komentar
Posting Komentar